My April 2018 Wrap Up

April 2018 Wrap Up | Writing Between Pauses

April is... over!? 

You know how I said that March was a doozy of a month? Well, April arrived bigger and badder. I had a lot of ups this month and a lot of downs. I'm going to write this post a bit differently than I usually do for these wrap ups, because I have a lot to talk about!

A few years ago (after I had Fo really), I decided that I shared too much online about everything that happened in my life. It wasn't fair to Forrest to put so much of his life out there. And really, it wasn't fair to myself either. But as I've blogger more the past 6 months, I realized it is hard to draw the line between "hobby blogger professionally" and "being cold"! Does that make sense? 

I'm hoping to use these wrap ups as a chance to share a bit more about me and my life as a mother and professional. 

1. Big Blogging News

I've been blogging for ages, really, but it's only been in the past 2-3 months that I started getting fun "blog emails." I don't want to talk about this too much as it starts to feel a bit like an echo chamber (and to a non-blogger reading this, it is so boring to hear bloggers write about this so I apologize in advance). It's nice to feel like I'm finally achieving something because I do work on this blog a lot. 

There was also a Twitter thread recently that I added my thoughts onto (you can read it all here) and it really underscored for me the importance of blogging for a purpose. I love my blog, but my purpose here is to educate and inspire. I don't just want free stuff. I want to write content that others want to read and for me, that means taking myself (and my personal life) out of it. I'm here to review products, to provide advice, and to help people figure out what works as a mother or young professional, lover of makeup, or whatever! I'm not changing the world.

One sponsorship I'm really proud of this month is my collab with Smile Brilliant. I'm still hosting a giveaway from them, so if you haven't entered yet, click here

2. Motherhood Never Stops Being a Challenge

Without going into too much detail, the Friday before last, we had our first big medical scare with Forrest. He has had croup before, where we rushed him to the ER at about midnight. And he's been quite sick before. But on that Friday, he'd gotten pushed at the park (still not happy about it) and fallen forward with his arms outstretched. He seemed fine initially; we went home, he napped, and I tried to get work done. When he woke up though, he was inconsolable. Finally, I got out of him that he was hurt and he needed a doctor. I called our pediatrician and just as Danny got home from work, my pediatrician called me back personally and said, "Put him in the car and get him to me now please." (In case you're wondering, I love our pediatrician; she's absolutely wonderful and made time to check his arm.) She immediately saw he wasn't using his arm properly and wanted us to get x-rays. 

Cut to us running around the entire city of Eugene to find an x-ray tech that was open. We kept getting to places immediately after they had closed or being told that they don't do outpatient x-rays. We ended up driving across town and getting into an office after a nurse from the hospital called and begged a fellow x-ray tech to stay late. (Bless that nurse!) Forrest got his x-rays. He had to wear a tiny sling for a few days (which was a horrible challenge). On Monday, our pediatrician called to tell us his elbow wasn't broken (thank goodness), but severely sprained. Rest and time helped and his little "broken wing" is better now. But it was scary!

I always think I can handle, or anticipate, the challenges that happen. But that Friday, I was not expecting to spend several hours with a sweaty, sobbing toddler trying to get someone to x-ray his arm! 

3. Learning to Live Slow

I impulse bought this book at Target three weeks ago. Let me say: I feel like I've learned so much from it already. I've stopped to use one of the mini-journals it comes with, but I'm so excited to read more. This book is all about taking the time to really wind down and think, to live a little slower, and to stop stuffing our lives with activities and jobs in order to feel like we are always "busy." It's about really letting yourself feel your emotions. Even writing about it, I feel myself calming down!

I get chronic migraines and tension headaches; I've gotten tension headaches since I was 20, but the migraines are new, within the last two years, really. They aren't fun and at this point, I know they are caused by my stress and anxiety. I'm hoping this book can help me start alleviating some of the anxiety that I feel (that often leaves me either unable to stop working or paralyzed at the thought of starting a task). 

4. Other Bits

A lot of highs. A lot of lows. I feel like that's been the past few months. However, my hope for May is that I can go a month without a serious medical or home expense (I bought new tires and a new dishwasher in March; I had to also buy another new piece of car equipment in April; my savings account is crying). 

However, this past weekend, Danny and I went on a solo trip to Portland. It was really nice to be able to just spend time with him and not worry about anything else for a change! 

I have a lot of exciting blog posts coming up this month, as well as some really fun personal stuff. 

How was your April? Did you have a good month? 

Everything You Need for Perfect Foundation With Oily Skin

Everything You Need for Perfect Foundation With Oily Skin | Writing Between Pauses

My biggest foundation woe has always been not being able to keep it on my skin. I've always (and I mean, always) had my foundation break down in the corners of my nose, the tip of my nose, my chin, and my forehead. It's pretty awkward to have everything else stay in play... and those points rub off! 

A few years ago, I set out to really solve the problem. I tried every primer under the sun. I tried every method of application. I tried expensive foundations, cheap foundations, concealer only.

Finally, I feel like I've settled on a routine that at least lasts my work day (anything beyond that is a guessing game!) and I thought I'd share my method with you. You definitely don't have to use these exact products, but I'll break down why they work. 

1. Start with a clean & moisturized face. 

Even if you washed your face the night before, you should wash your face before applying foundation. It washes off the oil and bacteria that emerged overnight. I usually wash with my charcoal bar, then apply Pacifica's Dreamy Youth moisturizer, a squeeze of Aveeno's Daily Moisturizer with SPF 15, and two drops of jojoba oil. Let your moisturizer sink into your skin for at least 5-10 minutes. 

2. Wash your beauty sponge every day. 

If you're one of those people who lets their beauty sponge get super dark brown... you're not doing your skin any favors. You need to wash it to its ORIGINAL COLOR every single day. I'm serious. And it needs to be stored in a proper drying rack (you can buy them for really cheap at TJ Maxx or Marshalls), not in a closed container or drawer. 

3. Apply setting powder first. 

I use elf's Skin Refining HD Powder in sheer. When it comes to setting powder, you should look for: a finely milled powder that applies cleanly and makes your skin feel immediately matte. I apply this before foundation because it helps foundation both stick to my skin and absorbs any oil that pops up throughout the day. 

I know this is a "controversial" step: many makeup artists contend that you just can't apply cream or liquid products (like foundation) over powder. But I've never had an issue with foundation applying over my powder. In fact, it makes my skin look better!

Another good base powder to try, if you struggle with large pores, is the IT Cosmetics Bye Bye Pores Airbrush powder. They also have a Pressed version of this powder that I quite like as a topping powder. 

4. Use a matte foundation. 

If a foundation is advertised as "dewy" or "glowy," it goes without saying that it probably won't work with very oily skin. (And the reverse is also true: if you have very dry skin, don't use matte foundations; they'll just dry down.) Right now, I'm using the Maybelline SuperStay Foundation, which I love, but because it's not cruelty-free, I'm looking for an affordable replacement. Some alternatives I'll be trying once my bottle of SuperStay is used up will be the FENTY foundation (notorious for drying down and being super matte) and the Tarte Face Tape Matte foundation

You also shouldn't use a ton of foundation. If it's matte and full-coverage, I usually apply a tiny dollop of highlighting cream, as that thins it out and keeps it from being too heavy on the skin (and going cakey). If you watch MUA videos on YouTube or Instagram, it's easy to think that piling on foundation is better--but I assure you, it's not. 

5. Use a matte concealer

It also goes without saying that if you use a matte foundation, you should use a matte concealer too (if you use concealer). Tarte's Shape Tape is one of the most matte concealers out there (and a little goes a long way); I use Shape Tape on my undereyes, as well as on the tip of my nose and the corners of my nose, then let it dry down for a minute or two before blending. I find this extra little step goes a long way towards preventing break down. 

6. Use more setting powder

You use setting powder as a primer. Now, it's time for more setting powder. I usually use a large, fluffy brush to brush some more of elf's HD Powder over my t-zone; then I set the rest of my face with a smaller face brush with Maybelline's Fit Me loose powder. I know this seems like a lot of powder, but it will help absorb oil and keep your foundation set throughout the day. 

7. Invest in a good setting spray

Setting spray is really everyone's best friend. I love the Wet'n'Wild Photofocus Matte Finish setting spray (because it's only $5!); you only need a spray or two to set your face. I've also heard great things about Urban Decay's All Nighter setting spray for oily skin. Mostly, you want to look for matte finish, again, just like with your foundation and concealer. 

8. Clean all your brushes every single day. 

Sorry, but remember that bit about washing your beauty sponge every day? Well, you'll be washing everything else too. If you have oily skin, the oils from your skin naturally get on your brushes, sponges, everything. To keep your makeup sanitary, and your brushes working well, give your brushes a rinse every single day, especially ones that you use for your whole face (like blush and contour brushes, face brushes, fan brushes, and more). It doesn't have to be a full scrub; just a rinse. I then lay mine flat on a towel while I'm at work. I fully wash everything with Dr. Bronner's soap on Sundays. If you aren't washing your brushes at least once a week, you need to change up your routine and start doing it. You'll be surprised at the difference it makes in your skin! 

How to Whiten Sensitive Teeth and Build Confidence in 2 Weeks*

smile brilliant sponsored post (1).png

When I was pregnant with Forrest, I felt more confident than I ever had before. I loved being pregnant, even though I later found out that I was having what is often thought of a difficult pregnancy. (In my defense, if you have nothing to compare pregnancy to, it's hard to know if it sucks or not!) 

It was after I had Forrest that I started to feel really less-than-confident. Not only had my body been radically altered, but I felt like my entire face was different! I got very puffy during pregnancy and, even in the weeks that followed, I continued to look quite puffy and bloated. 

During pregnancy, I developed prenatal gingivitis. This is extremely common and is almost always something you can't really prevent from happening; I'd never had issues with my teeth before and I took extremely good care of my teeth. But my smile was affected by pregnancy, no matter how well I took care of my teeth. 

I worked really hard postpartum to improve my dental health--and I'm glad to say I don't have gingivitis anymore, thankfully! But my nervousness over my teeth, and how they look, had taken its toll. I knew I needed to try to gain some confidence back when it came to my smile. 

Enter Smile Brilliant. I had tried other tooth whitening systems in the past but found them cumbersome or so mild that they had no effect. I also didn't have the money to pay for professional whitening at my dentist's (trust me, I asked). So when I heard about Smile Brilliant, I knew I wanted to try it. And thankfully, the process is super simple! 

The Process

The Process - Smile Brilliant

Your first whitening kit comes with supplies to make tooth impressions, plus all the whitening and desensitizing gel you'll need for later. I had so much fun doing my impressions for my trays; I know that sounds dorky, but mixing up the base and catalyst was really fun. You just mix them together and press into the blue tray, then press onto your top or bottom teeth. (Then repeat for whichever ones you didn't do!) Once you've done your impressions, you let them dry and mail them back to Smile Brilliant, where they make you a set of your own, customer trays

That's really the secret to Smile Brilliant: these aren't generic trays or strips that might not fit on your teeth. Because they fit so well, it's easier to get an even whitening on your teeth! The process is so simple and fast; it felt like it took barely any time at all!  

But Does It Work?

Before and After | Writing Between Pauses

Once I got my trays, I was so excited to start! Since I received a sensitive kit (as I have quite sensitive teeth), I first use the whitening gel for about 30 minutes. I then use the desensitizing gel for 25 minutes. Within my first week of use, my husband commented on how much brighter my smile looked. If that's not a compliment, I don't know what is!

I used Smile Brilliant every night for about 10 days to achieve these results. I took a break after 10 days (and I'll talk about why in a little bit) and then started whitening every other day after that. On the days after I whitened, I tried to avoid anything that might heavily stain my teeth, like tomato sauce or coffee (that was a tough one). 

I'm really, really happy with my results. I bought a lavender lipstick a while ago that I absolutely love--but when I smiled, it made my teeth look so stained! I had pretty white teeth before, but that lipstick made them look dingy. I'm excited to try it again now that my teeth are brighter and whiter. There is nothing like having a brighter smile that makes you feel more confident about your appearance. 

A Few Notes

After 10 days, I experienced something that is known as "blanching": basically, I burned my gums with the whitening gel. The Smile Brilliant instructions are really specific about how much gel to put in my trays--but I had accidentally added a bit more than usual and thought, "It will be fine!" It wasn't fine. Within 5 minutes, my gums on the left side of my mouth were burning. I took it off and rinsed, then wore the desensitizing gel for about 15 minutes in the hope that it would help. My gums were fine within 24 hours, but it was a big lesson: follow the instructions! 

As I said, I have quite sensitive teeth, so I received a sensitive kit from Smile Brilliant; the desensitizing gel is an important step if you have more sensitive teeth because it helps bolster your teeth back up some you don't damage them. 

It goes without saying that if you want to try a whitening kit like Smile Brilliant, you should speak to your dentist first. I just gave my dentist a call and talked to him about it; he checked out the website and gave me the ok, with a reminder to follow their instructions and not go overboard.

Try It Yourself! 

I loved whitening my teeth with Smile Brilliant. To enter to win a credit for a Smile Brilliant kit, click here. You have 7 days to enter; this giveaway is open to USA, UK, Australia and Canadian residents. 

If you'd like to try Smile Brilliant, click here to purchase your own kit** and use coupon code WRITINGBETWEENPAUSES15 for 15% off! 

Disclaimer: As always, an asterisk (*) in the title of this post indicates that this is a sponsored post. I received my Smile Brilliant whitening kit for free in exchange for review from Smile Brilliant. However, all opinions are my own. As well, affiliate links are marked with a double asterisk (**); I do receive a small commission for any orders placed through these links. It helps me keep Writing Between Pauses running! To learn more about my disclosure policy, click here

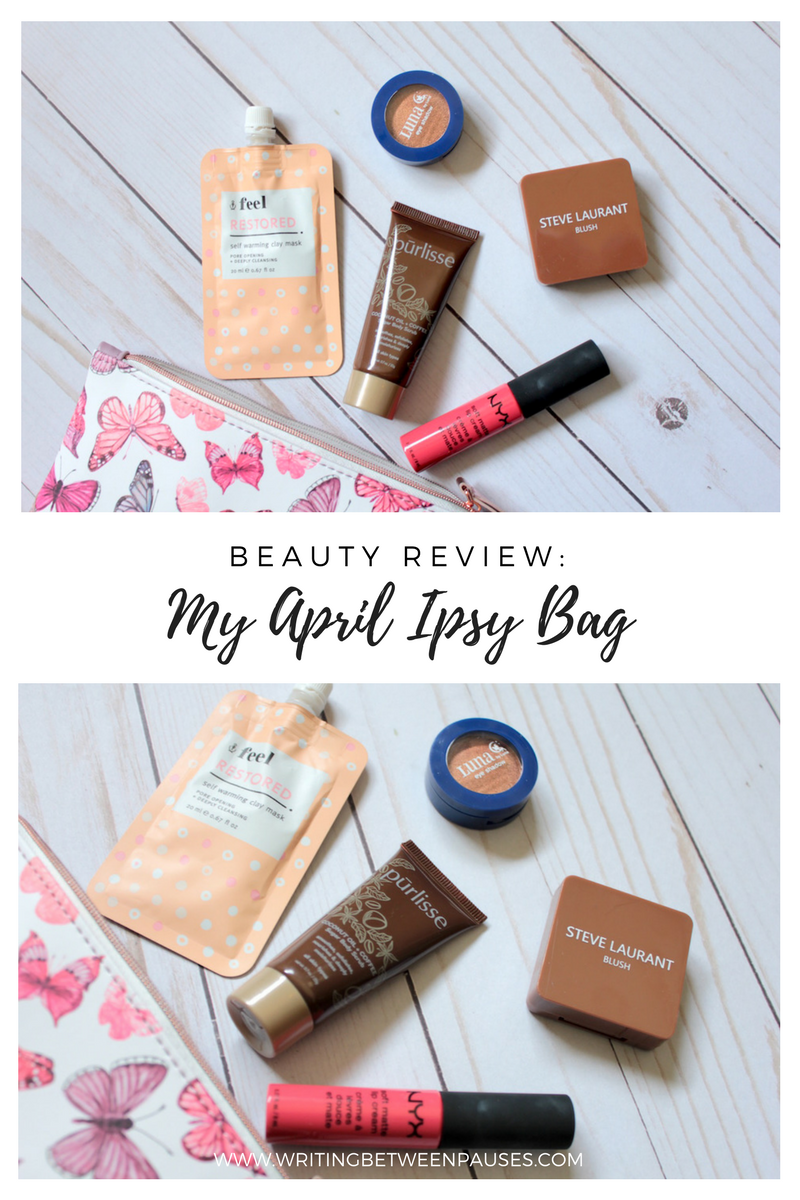
Beauty Review: My April Ipsy Bag

Beauty Review: My April Ipsy Bag | Writing Between Pauses

Mercury Retrograde ended last weekend and, let me just say, it was an absolute doozy for me. It started rough (a really high tax bill) and ended rough (having to replace a major appliance in my home, a shattered windshield, buying a new set of tires and getting a flat tire 2 hours later, and tons of tiny inconveniences)... but I made it! I'm here!

So when Danny came home on April 14 with my Ipsy bag, I was beyond ecstatic. After all the money I spent, I needed something little to get me excited and make me feel better. Plus, I had been so excited about the products in my bag. 

Without further ado, let's jump into what I got, how I like everything, and the total value of this bag! 

(To read my past Ipsy bag reviews, click here.) 

Ipsy Bag 1

1. Feel Restored Warming Clay Mask, $7.60 Value

You know I love a mask, so I was really excited to see this mask. Here's what it promises: 

This magical mask is infused with white charcoal powder which warms up upon contact with your skin to open up pores and clear out all the icky stuff that’s hiding deep down.

And you know what? It absolutely does warm up when you start to apply it! It's really soothing and lovely to put on, because it does get so warm. This little sample pack only has enough for about 2 uses; it had 20ml. The full size costs $38 and has 100ml, so 5-times the size. You'd get about 10 uses. That equals out to about $3-4 per use (or "per mask"). Is that worth it? I usually pay about $2-3 per sheet masks, so it's a little more expensive than usual. However, it's a really nice mask and my face did feel really great afterwards (if a little dry). 

2. Purlisse Coconut Oil + Coffee Sugar Scrub, $10 

I love the brand Purlisse--their Lotus Seed mask that I got in my January bag is one of my favorites--so I was excited to get this coffee scrub. I love a body exfoliator as I recently stopped using plastic loofas (to reduce the amount of shedded plastic I put into waterways). Here's what it promises: 

Coffee grounds are great exfoliators, and they’re rich in antioxidants. They also help improve circulation to firm and tone your skin.

Lovely! This scrub smells amazing, almost energizing (the coffee smell, really), and left my skin feeling so, so soft. I definitely needed to moisturize well afterwards, but it was worth it! I also found it helped remove the eczema I get on my upper arms, so there is that benefit too. 

3. NYX Soft Matte Lip Cream in Ibiza, $6.50 

Soft Matte Lip Cream is one of my favorite lip formulas. I like this shade a lot; I was worried I would receive a shade I already own (I own about 10 of them!). This is descriped as a "deep rosy-pink", but that's actually not correct. It's quite bright, not a melon or coral, but closer to a watermelon shade. 

Ibiza

I know some struggle with the formula of the Soft Matte Lip Creams, but I find them very long lasting. This lasted me through a trip to Target, a Starbucks, lunch, and even dinner. When I went to take an After shot for my teeth whitening later, I had stains on my lips from it! I will say, the price on these has gone up in the last few years; they were definitely closer to $4 when I bought my first tube of Stockholm. 

4. Luna by Luna Cosmetics Eyeshadow in Spiced Pumpkin, $15

I was hoping I would get this shade and, surprise, I did! Spiced Pumpkin is a lovely warm bronze shade. I was not impressed by my first Luna Cosmetics item (a baby pink lipstick way back in my October ipsy bag). However, I was ready to give this eyeshadow a shot and I'm so glad I did. 

I've come to accept that I don't look great in warm pink tones (I write as I sob over my Too Faced peach palettes), but I do look good in more orange or bronze tones. This one is absolutely lovely and looks great on its own. I've been playing with single-shadow eye looks and trying to find ways to add dimension without a ton of effort... I love this eyeshadow for that! 

5. Steve Laurant Beauty Blush in Rose All Day, $22

You know I love blushes, so I was beyond excited to receive a new one. This shade from Steve Laurant is a soft, medium-toned pink that would look good on probably every skin tone. It's really, really pretty. At first, I thought it wasn't very pigmented; I used a brush and put some on my arm. Nothing. The next morning, I started doing my make up and loaded up a brush with it and... it was so much blush! Oops! I wiped it off, redid my foundation, and tried again. 

You know how when you go out in the spring and it's a little chilly out, so you get really pink-cheeked and lovely? This is the perfect blush to replicate that look! It's really gorgeous and has the perfect finish for a daily look. 

Ipsy Bag 2

Final Thoughts

The final total value of this ipsy bag is $61.10! That's pretty good for a bag where I love every single item. That never happens. I don't have one single dud in this bag. Amazing? Genius? The best? I'm obsessed with every item here. It's not my highest valued bag, but it's one of my favorites ever. If you'd like to try Ipsy, use my referral link here

My Top 5 Must-Have Drugstore Products

My Top 5 Must-Have Drugstore Products | Writing Between Pauses

I primarily shop in drugstores when it comes to make up. I stop at Walgreens to check out any new arrivals at least once a week (don't judge me) and I love seeing what new collections have dropped. 

The fact is, for most people out there, drugstore prices are about where the buck stops when it comes to buying beauty products. Anything more than $15 for a single item is absolutely out of my price range, as well as the price range of others. I might splurge for the occasional big ticket item, but that is very, very rare. 

I decided to put together a list of my absolute favorite drugstore beauty products. You don't have to be a beauty guru to use these products either--I like them because they are simple, they get the job done, and they don't break the bank. 

The Best Drugstore Loose Powders

1. Maybelline Fit Me! Light Finishing Powder, $7.99

I use a lot of powder on a daily basis, just to control my oily skin, and this is my absolute favorite finishing powder of all time. However, Maybelline is not a cruelty-free company, so keep that in mind. I keep using this product, however, because it is the only one that suits my skintone that I have been able to find. Here's what Maybelline has to say about this product: 

"Fit Me® Loose Finishing Powder is a mineral-based formula designed to help control shine and smooth skin’s texture with a hint of color."

Is this true? Absolutely. I use a tiny amount of this powder over my t-zone to help control shine and blur my pores just a little bit more. It does the job and adds a nice wash of color! My skin is quite pale, so I can look washed out really easily. This product weighs in at 20g, or about 0.7oz of product. For $7.99, that is a fair amount--and I can say that my first purchase of this product has lasted me over 3 months. 

2. elf HD Powder, $6

HD powder is often used as a setting powder, but it can often cause flashback, aka when you take a photo of your face with flash and you look super white. If you've ever seen photos of celebrities at awards shows where it looks like they have white powder all over their face, well, you know why now. 

However, I use HD powder a little differently: I use it before my foundation. 

HD powder absorbs oil, dries out your skin, and keeps your make up set. But using it on top can cause all kinds of problems. I learned from a few YouTube channels that you can use it beforehand if you're very, very oily and it sets your foundation better than a primer. Well, I've been sold ever since and the best powder I've ever used for this has been elf's HD Powder. For only $6, it's an absolute steal compared to other powders. One tub lasts me about a month (but I use quite a bit every day). 

The Best Drugstore Foundations

1. Maybelline Super Stay Foundation, $11.99

If you like full-coverage foundation, this one is for you. I originally saw this first on Alissa Ashley's YouTube channel (her video here). She loved the foundation, but she and I have both very different skin tones and very different skin types. That being said, I bought it a few days later. A tube has 1 fluid ounce, which is standard for most foundations. I've been using it at least twice a week since early February and my tube is halfway full. I estimate it would last around 2-4 months for the average user, especially if you extend it by mixing in luminizer or moisturizer for lighter coverage. 

2. Wet'n'Wild Cushion Foundation, $8.99

As you may remember from my Wet'n'Wild Photo Focus foundation review, I was not a huge fan. I didn't like the smell, the feel, or the look of that foundation. So when I saw thataylaa's video about the Wet'n'Wild Cushion Foundation, I was really intrigued and a little bit hesitant. However, when I spotted it at Walgreens the next day, I decided to take the plunge. I mean, why not? It's only $8.99. And guess what? I really love how this foundation looks. If you prefer lighter coverage and have dry skin, this is truly a perfect foundation for you; it's very dewy, very light, and looks really pretty on. There are certain times in my cycle where my skin gets quite dehydrated, so I end up reaching for foundations like this one. 

And despite how dark the tone looks on the packaging, the lightest shade is a perfect match for me. (For reference, I wear 44 light neutral in the Kat Von D Lock It foundation.) I personally don't use the provided sponge; my Beauty Blender applies is much faster! 

The Best Drugstore Eyeshadow

1. Wet'n'Wild eyeshadows

Whether it's the Wet'n'Wild Eyeshadow Quads or the 10 Pan Palettes, I'm not pulling your leg when I say that my Wet'n'Wild eyeshadows are my favorites. I especially like the eyeshadow quads because they are only $1.99. Seriously, $1.99. And the 10 Pan Palettes are only $4.99 each. $4.99! If you are looking for new shades of eyeshadow, they are the most affordable route and all of their foundations are really high quality, despite the price. I recently decided that I was done with warm-toned eyeshadows, so I "splurged" on several eyeshadow quads to test out some cool-toned colors. Absolutely worth it because it was less than $10 total! 

My Beauty Favorites: Highlights

My Beauty Favorites: Highlights | Writing Between Pauses

When highlighting first emerged as a trend, I was rightfully reticent. After all, as an oily skinned person, I spent my entire teenage and adult life trying to look less shiny. So as matte-matte-matte skin disappeared and full-face glam became the norm, highlighting was a natural step forward. As makeup gurus contour their faces to perfection, highlighting is just a natural part of that. 

But still, it was a hard trend to hope on. I don't typically contour--and I definitely don't use cream contours. If I'm going out for the evening, I might use bronzer alongside blush, but that's about it. However, once I started using highlighter, I realized that I really, really like it... and that you don't necessarily have to do a full contour for it to look good. 

Highlighting brings attention, and dimension, to the high points of your face. Think your cheekbones, the tip of your nose, and your cupid's bow. By applying highlight to these places, you can make them more pronounced--and create cheekbones where you might not have great ones. I have a pretty round face with prominent, and full, cheeks, so highlighting my cheekbones is a daily must now. 

I narrowed down my highlighters to my four favorites. As a note, I definitely prefer a more subtle highlight--I don't like going crazy or playing with a lot of colors--but these are not the only highlights I use! 

1. Dirty Little Secret Baked Highlighter in Bellini

I received this highlight in last month's ipsy bag (review here) and, as I posted on Instagram recently, it's rapidly become my favorite highlight. It is a more cool-toned pale pink color and applies beautifully with a fan brush. It's pigmented enough that you could also use it as a blush or even an eyeshadow. For a daily, subtle glow, this one is perfect. (I'm also partial to the Bellisima color from DLS!) 

2. Ulta Beauty Duo Chrome Illuminator

I originally received this highlight from the 12 Days of Beauty Advent Calendar from Ulta. (You can read my full review here!) As I wrote then, I was unsure of what color this highlight actually was, as it's not labeled on the packaging. However, I think it is closest to either Mermaid or Fairy (although it looks like Fairy is no longer available). It is a duo chrome, which means it is not sparkly like some highlights, but shifts between white, pink, and lavender, with a hint of blue. It is absolutely not an everyday look, but for events, it can make a huge difference. 

3. Ulta Beauty Rainbow Highlighter

Rainbow highlights aren't everyone's cup of tea, but they sure are popular. There are rainbow highlighters available from not just Ulta Beauty, but tons of indie brands as well was Wet'n'Wild, TooFaced, Maybelline, Essence, and more. Again, this is not necessarily an everyday look, but can look great in photos or for more fun events. As well, you can use the separate rows on their own, or as eyeshadows. I personally love using the yellow and gold lines as solo highlights, as well as to highlight my inner corner. 

4. Ulta Beauty Liquid Illuminator in Northern Lights

Have you tried adding a few drops of liquid highlighter to your foundation? At first, I thought this did nothing... but let me say, once I started doing it, I was surprised at how it turned out! If you are looking for a lovely, subtle glowy look, add a few drops of this liquid illuminator (Northern Lights is a very light, pearly pink shade) to your foundation and it will change your entire look. 

My Beauty Favorites: Blushes

My Beauty Favorites: Blushes | Writing Between Pauses

It feels like I didn't really start caring about blush until a few years ago. When I was in high school, I don't think anyone I know used blush. In the early 2000s, bronzer was a big deal; I remember my friends covering essentially their whole faces in bronzer. I never rocked that look (I'm way too pale), so I mostly just wore foundation, powder, and that was it. I took all the color out of my face with foundation... and didn't add any back in!  

yikes reaction

The first blush I can remember buying, at least in the last 5 years, was Wet'n'Wild's Pearlescent Pearl (a very dead-on dupe for NARS Orgasm, if you're looking!) and while I love that blush, it's not one of my current favorites.

You see... blush is now one of my favorite items to buy, one of my favorite beauty items to put on, and something that I'm a little obsessed with. Most days, I wear foundation or concealer, powder, and blush, maybe some mascara if I'm feeling fancy. So most days, blush is the thing that really makes a huge difference in my look. 

So after a very taxing decision process, I picked out my top 3 favorite blushes. (And I'll also include my 2 favorite brushes for applying blush!) 

Blush Image 2

1. Pixi by Petra in Peach Honey

I received this blush in my first Ipsy bag and when I first reviewed it, I thought it was more of a highlighter than a blush. However, after applying it one day and getting to work, I realized the truth: my bathroom lighting just sucks! It's definitely a more subtle blush and being peachier than what I usually wear, it definitely falls into the category of being outside of my go-to. However, it has such a nice, natural effect that I think it's one of those blushes that looks good on everyone. 

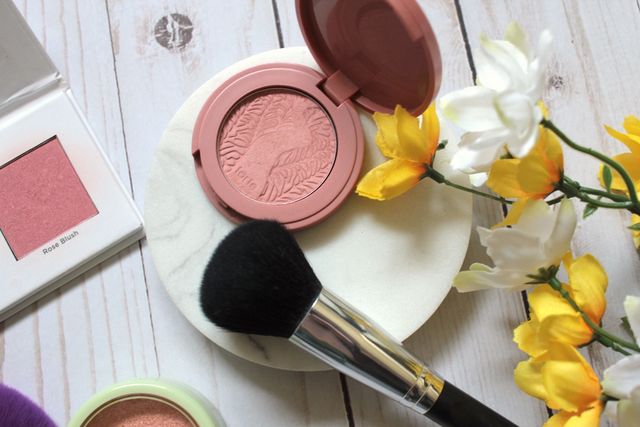
2. Tarte Amazonian Clay Blush in Paaarty

I (and almost everyone else) received this blush in the 2017 Sephora birthday gift. (If you chose the skincare gift, don't worry, you can purchase it solo.) I love this blush, even though the name is actually one of the worst ever; I never remember the correct number of "a"s. It is a perfect pink color: very traditional, very cute, and very perfect on nearly every skintone. 

3. Ulta Beauty Blush in Rose

I debated including this blush, even though it is my current "I wear this every single day" color because, well, I couldn't find it on Ulta's website! The problem sometimes with free gifts is that they don't always have everything for sale. However, this is the same shade as the Ulta Beauty Blush in Sweet Pea here; so if you want to buy it, that's a great option. This shade is a dusty, slightly mauve-y pink. I wear mauve lips almost every single day, so if I'm going for a monochromatic look, this is what I reach for. It's super pigmented, super blendable, and absolutely lovely. 

Bonus: My Favorite Brushes

I used to use my fingers to apply blush, then I would sweep it out with my powder brush (yikes). Now, I have two dedicated blush brushes (three actually, but that's neither here nor there) that I love using, depending on the formula and look I'm going for. 

1. Crown C141 Small Chisel Brush: this brush is great for blushes that are a little less pigmented and you need to concentrate to a specific area. (I also love this brush for packing on mattifying powder!) I use it specifically with my Pixi by Petra blush. 

2. F.A.R.A.H. 30F: this brush is angled, so it gives you a great sweeping look. If you're using a highly pigmented blush, this is the one you want to go for; being softer and fluffier, it blends out blush much easier. 

Product Review: Photowall*

Product Review: Photowall* | Writing Between Pauses

If you're like me, you have photos of just about everything. I have more photos of Forrest than I truly care to admit to (it's numbering in the 10,000 range, ok?) and I have a lot of them printed. I am a little obsessed with creating collages of all kinds. I love being able to see photos throughout my house; I think it makes a house feel really warm and lovely to have photos everywhere. Plus, I just like showing off our cute little family!

So when I was approached by Photowall to review a product from their website, I jumped at the chance. 

Photowall is a Swedish-run website that produces wallpaper and canvas prints. They have hundreds of designs available, plus you can upload your own photos and have a canvas printed with that photo! There are lots of websites that do this and I have used them before--but I'll be honest, Photowall is the highest quality canvas I've ever received!

Photowall Review 1 | Writing Between Pauses

It took me what felt like forever to choose an image for my canvas! I originally wanted to have a family portrait printed, but I couldn't decide on one, many of my photos (being from my iPhone) were just a bit too low resolution, and I really hemmed and hawed. Then I started browsing Photowall's catalogue of available prints and realized there were so many options! I almost got a floral design; I almost got a print of Portland, OR's skyline; and then, I found this one. 

It's a grove of aspens with yellow leaves. As we all are probably aware of at this point, I love Autumn--and I have a grey painted wall in my living room. I love grey and yellow together; my kitchen is grey and yellow themed. So it seemed perfect to get this canvas and do a little redesign in my living room. 

Ordering was super easy; you choose your print, or upload a photo, choose your sign, pay, and that's it! Shipping was super fast too. I ordered this on a weekend, I believe, and it arrived on the following Friday. 

When it arrived, my husband said, "this is way too small for a canvas!" That's because Photowall ships with everything for you to stretch your canvas yourself. You have a roll of canvas and a few pieces of wood for the frame, plus screws to secure it together and a hanger for mounting on the wall. Putting it together was super easy and the instructions were very clear. It was also really fun! 

In the future, I think I would go bigger; I got the smallest size canvas, as I just wasn't sure how it would look in the space (it's a little less than 16 inches). I definitely wish I had gone 24 inches or larger, I think it would work just as well! But I really love how it looks and I feel like I'm slowly but surely sprucing up our living room to look like grown ups (and not just a toddler) live here. 

If you'd like to try Photowall, just visit their website here and use my code MichelleLockeCampaign2018 for 20% off your order. My code is only available until the end of April, so order soon! 

*Disclaimer: As always, the asterisk (*) in the title of this post denotes that I received product from Photowall in exchange for a review. However, all thoughts and opinions remain my own. I really love Photowall and hope you will too!