Beauty

How to Whiten Sensitive Teeth and Build Confidence in 2 Weeks*

smile brilliant sponsored post (1).png

When I was pregnant with Forrest, I felt more confident than I ever had before. I loved being pregnant, even though I later found out that I was having what is often thought of a difficult pregnancy. (In my defense, if you have nothing to compare pregnancy to, it's hard to know if it sucks or not!) 

It was after I had Forrest that I started to feel really less-than-confident. Not only had my body been radically altered, but I felt like my entire face was different! I got very puffy during pregnancy and, even in the weeks that followed, I continued to look quite puffy and bloated. 

During pregnancy, I developed prenatal gingivitis. This is extremely common and is almost always something you can't really prevent from happening; I'd never had issues with my teeth before and I took extremely good care of my teeth. But my smile was affected by pregnancy, no matter how well I took care of my teeth. 

I worked really hard postpartum to improve my dental health--and I'm glad to say I don't have gingivitis anymore, thankfully! But my nervousness over my teeth, and how they look, had taken its toll. I knew I needed to try to gain some confidence back when it came to my smile. 

Enter Smile Brilliant. I had tried other tooth whitening systems in the past but found them cumbersome or so mild that they had no effect. I also didn't have the money to pay for professional whitening at my dentist's (trust me, I asked). So when I heard about Smile Brilliant, I knew I wanted to try it. And thankfully, the process is super simple! 

The Process

The Process - Smile Brilliant

Your first whitening kit comes with supplies to make tooth impressions, plus all the whitening and desensitizing gel you'll need for later. I had so much fun doing my impressions for my trays; I know that sounds dorky, but mixing up the base and catalyst was really fun. You just mix them together and press into the blue tray, then press onto your top or bottom teeth. (Then repeat for whichever ones you didn't do!) Once you've done your impressions, you let them dry and mail them back to Smile Brilliant, where they make you a set of your own, customer trays

That's really the secret to Smile Brilliant: these aren't generic trays or strips that might not fit on your teeth. Because they fit so well, it's easier to get an even whitening on your teeth! The process is so simple and fast; it felt like it took barely any time at all!  

But Does It Work?

Before and After | Writing Between Pauses

Once I got my trays, I was so excited to start! Since I received a sensitive kit (as I have quite sensitive teeth), I first use the whitening gel for about 30 minutes. I then use the desensitizing gel for 25 minutes. Within my first week of use, my husband commented on how much brighter my smile looked. If that's not a compliment, I don't know what is!

I used Smile Brilliant every night for about 10 days to achieve these results. I took a break after 10 days (and I'll talk about why in a little bit) and then started whitening every other day after that. On the days after I whitened, I tried to avoid anything that might heavily stain my teeth, like tomato sauce or coffee (that was a tough one). 

I'm really, really happy with my results. I bought a lavender lipstick a while ago that I absolutely love--but when I smiled, it made my teeth look so stained! I had pretty white teeth before, but that lipstick made them look dingy. I'm excited to try it again now that my teeth are brighter and whiter. There is nothing like having a brighter smile that makes you feel more confident about your appearance. 

A Few Notes

After 10 days, I experienced something that is known as "blanching": basically, I burned my gums with the whitening gel. The Smile Brilliant instructions are really specific about how much gel to put in my trays--but I had accidentally added a bit more than usual and thought, "It will be fine!" It wasn't fine. Within 5 minutes, my gums on the left side of my mouth were burning. I took it off and rinsed, then wore the desensitizing gel for about 15 minutes in the hope that it would help. My gums were fine within 24 hours, but it was a big lesson: follow the instructions! 

As I said, I have quite sensitive teeth, so I received a sensitive kit from Smile Brilliant; the desensitizing gel is an important step if you have more sensitive teeth because it helps bolster your teeth back up some you don't damage them. 

It goes without saying that if you want to try a whitening kit like Smile Brilliant, you should speak to your dentist first. I just gave my dentist a call and talked to him about it; he checked out the website and gave me the ok, with a reminder to follow their instructions and not go overboard.

Try It Yourself! 

I loved whitening my teeth with Smile Brilliant. To enter to win a credit for a Smile Brilliant kit, click here. You have 7 days to enter; this giveaway is open to USA, UK, Australia and Canadian residents. 

If you'd like to try Smile Brilliant, click here to purchase your own kit** and use coupon code WRITINGBETWEENPAUSES15 for 15% off! 

Disclaimer: As always, an asterisk (*) in the title of this post indicates that this is a sponsored post. I received my Smile Brilliant whitening kit for free in exchange for review from Smile Brilliant. However, all opinions are my own. As well, affiliate links are marked with a double asterisk (**); I do receive a small commission for any orders placed through these links. It helps me keep Writing Between Pauses running! To learn more about my disclosure policy, click here

Beauty Review: My April Ipsy Bag

Beauty Review: My April Ipsy Bag | Writing Between Pauses

Mercury Retrograde ended last weekend and, let me just say, it was an absolute doozy for me. It started rough (a really high tax bill) and ended rough (having to replace a major appliance in my home, a shattered windshield, buying a new set of tires and getting a flat tire 2 hours later, and tons of tiny inconveniences)... but I made it! I'm here!

So when Danny came home on April 14 with my Ipsy bag, I was beyond ecstatic. After all the money I spent, I needed something little to get me excited and make me feel better. Plus, I had been so excited about the products in my bag. 

Without further ado, let's jump into what I got, how I like everything, and the total value of this bag! 

(To read my past Ipsy bag reviews, click here.) 

Ipsy Bag 1

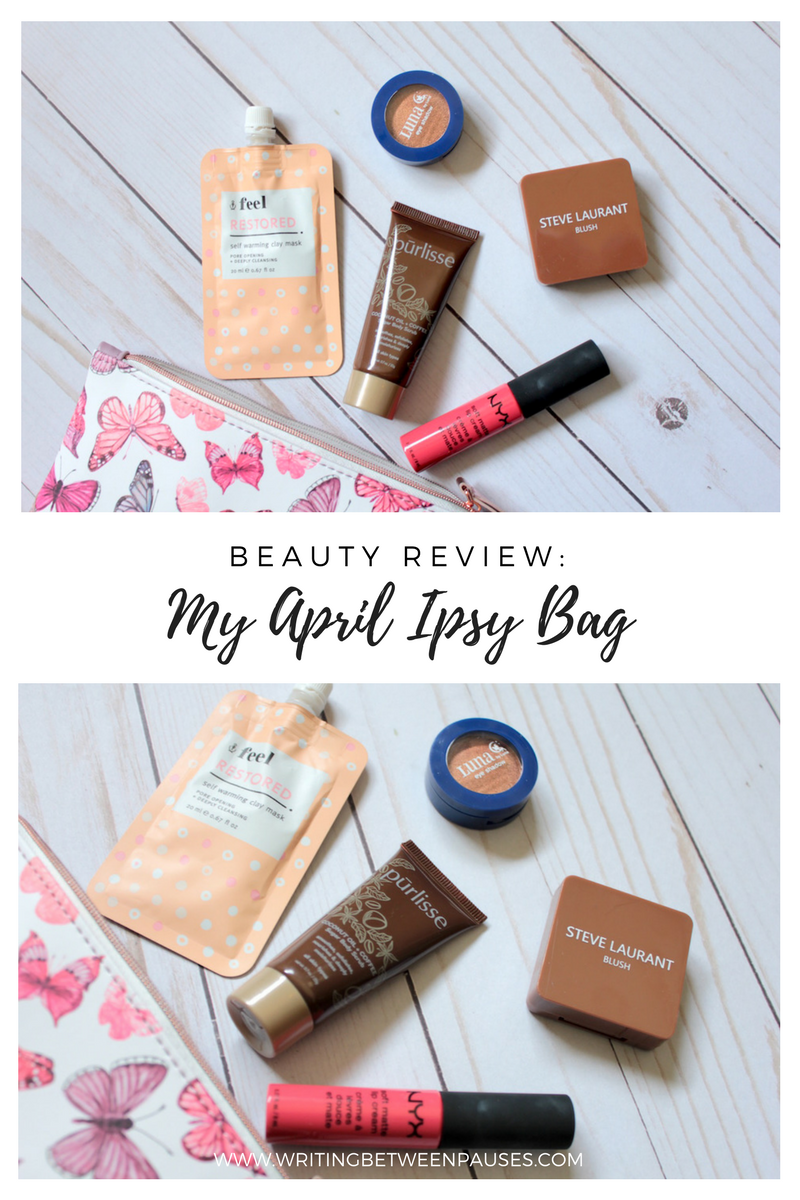
1. Feel Restored Warming Clay Mask, $7.60 Value

You know I love a mask, so I was really excited to see this mask. Here's what it promises: 

This magical mask is infused with white charcoal powder which warms up upon contact with your skin to open up pores and clear out all the icky stuff that’s hiding deep down.

And you know what? It absolutely does warm up when you start to apply it! It's really soothing and lovely to put on, because it does get so warm. This little sample pack only has enough for about 2 uses; it had 20ml. The full size costs $38 and has 100ml, so 5-times the size. You'd get about 10 uses. That equals out to about $3-4 per use (or "per mask"). Is that worth it? I usually pay about $2-3 per sheet masks, so it's a little more expensive than usual. However, it's a really nice mask and my face did feel really great afterwards (if a little dry). 

2. Purlisse Coconut Oil + Coffee Sugar Scrub, $10 

I love the brand Purlisse--their Lotus Seed mask that I got in my January bag is one of my favorites--so I was excited to get this coffee scrub. I love a body exfoliator as I recently stopped using plastic loofas (to reduce the amount of shedded plastic I put into waterways). Here's what it promises: 

Coffee grounds are great exfoliators, and they’re rich in antioxidants. They also help improve circulation to firm and tone your skin.

Lovely! This scrub smells amazing, almost energizing (the coffee smell, really), and left my skin feeling so, so soft. I definitely needed to moisturize well afterwards, but it was worth it! I also found it helped remove the eczema I get on my upper arms, so there is that benefit too. 

3. NYX Soft Matte Lip Cream in Ibiza, $6.50 

Soft Matte Lip Cream is one of my favorite lip formulas. I like this shade a lot; I was worried I would receive a shade I already own (I own about 10 of them!). This is descriped as a "deep rosy-pink", but that's actually not correct. It's quite bright, not a melon or coral, but closer to a watermelon shade. 

Ibiza

I know some struggle with the formula of the Soft Matte Lip Creams, but I find them very long lasting. This lasted me through a trip to Target, a Starbucks, lunch, and even dinner. When I went to take an After shot for my teeth whitening later, I had stains on my lips from it! I will say, the price on these has gone up in the last few years; they were definitely closer to $4 when I bought my first tube of Stockholm. 

4. Luna by Luna Cosmetics Eyeshadow in Spiced Pumpkin, $15

I was hoping I would get this shade and, surprise, I did! Spiced Pumpkin is a lovely warm bronze shade. I was not impressed by my first Luna Cosmetics item (a baby pink lipstick way back in my October ipsy bag). However, I was ready to give this eyeshadow a shot and I'm so glad I did. 

I've come to accept that I don't look great in warm pink tones (I write as I sob over my Too Faced peach palettes), but I do look good in more orange or bronze tones. This one is absolutely lovely and looks great on its own. I've been playing with single-shadow eye looks and trying to find ways to add dimension without a ton of effort... I love this eyeshadow for that! 

5. Steve Laurant Beauty Blush in Rose All Day, $22

You know I love blushes, so I was beyond excited to receive a new one. This shade from Steve Laurant is a soft, medium-toned pink that would look good on probably every skin tone. It's really, really pretty. At first, I thought it wasn't very pigmented; I used a brush and put some on my arm. Nothing. The next morning, I started doing my make up and loaded up a brush with it and... it was so much blush! Oops! I wiped it off, redid my foundation, and tried again. 

You know how when you go out in the spring and it's a little chilly out, so you get really pink-cheeked and lovely? This is the perfect blush to replicate that look! It's really gorgeous and has the perfect finish for a daily look. 

Ipsy Bag 2

Final Thoughts

The final total value of this ipsy bag is $61.10! That's pretty good for a bag where I love every single item. That never happens. I don't have one single dud in this bag. Amazing? Genius? The best? I'm obsessed with every item here. It's not my highest valued bag, but it's one of my favorites ever. If you'd like to try Ipsy, use my referral link here

My Top 5 Must-Have Drugstore Products

My Top 5 Must-Have Drugstore Products | Writing Between Pauses

I primarily shop in drugstores when it comes to make up. I stop at Walgreens to check out any new arrivals at least once a week (don't judge me) and I love seeing what new collections have dropped. 

The fact is, for most people out there, drugstore prices are about where the buck stops when it comes to buying beauty products. Anything more than $15 for a single item is absolutely out of my price range, as well as the price range of others. I might splurge for the occasional big ticket item, but that is very, very rare. 

I decided to put together a list of my absolute favorite drugstore beauty products. You don't have to be a beauty guru to use these products either--I like them because they are simple, they get the job done, and they don't break the bank. 

The Best Drugstore Loose Powders

1. Maybelline Fit Me! Light Finishing Powder, $7.99

I use a lot of powder on a daily basis, just to control my oily skin, and this is my absolute favorite finishing powder of all time. However, Maybelline is not a cruelty-free company, so keep that in mind. I keep using this product, however, because it is the only one that suits my skintone that I have been able to find. Here's what Maybelline has to say about this product: 

"Fit Me® Loose Finishing Powder is a mineral-based formula designed to help control shine and smooth skin’s texture with a hint of color."

Is this true? Absolutely. I use a tiny amount of this powder over my t-zone to help control shine and blur my pores just a little bit more. It does the job and adds a nice wash of color! My skin is quite pale, so I can look washed out really easily. This product weighs in at 20g, or about 0.7oz of product. For $7.99, that is a fair amount--and I can say that my first purchase of this product has lasted me over 3 months. 

2. elf HD Powder, $6

HD powder is often used as a setting powder, but it can often cause flashback, aka when you take a photo of your face with flash and you look super white. If you've ever seen photos of celebrities at awards shows where it looks like they have white powder all over their face, well, you know why now. 

However, I use HD powder a little differently: I use it before my foundation. 

HD powder absorbs oil, dries out your skin, and keeps your make up set. But using it on top can cause all kinds of problems. I learned from a few YouTube channels that you can use it beforehand if you're very, very oily and it sets your foundation better than a primer. Well, I've been sold ever since and the best powder I've ever used for this has been elf's HD Powder. For only $6, it's an absolute steal compared to other powders. One tub lasts me about a month (but I use quite a bit every day). 

The Best Drugstore Foundations

1. Maybelline Super Stay Foundation, $11.99

If you like full-coverage foundation, this one is for you. I originally saw this first on Alissa Ashley's YouTube channel (her video here). She loved the foundation, but she and I have both very different skin tones and very different skin types. That being said, I bought it a few days later. A tube has 1 fluid ounce, which is standard for most foundations. I've been using it at least twice a week since early February and my tube is halfway full. I estimate it would last around 2-4 months for the average user, especially if you extend it by mixing in luminizer or moisturizer for lighter coverage. 

2. Wet'n'Wild Cushion Foundation, $8.99

As you may remember from my Wet'n'Wild Photo Focus foundation review, I was not a huge fan. I didn't like the smell, the feel, or the look of that foundation. So when I saw thataylaa's video about the Wet'n'Wild Cushion Foundation, I was really intrigued and a little bit hesitant. However, when I spotted it at Walgreens the next day, I decided to take the plunge. I mean, why not? It's only $8.99. And guess what? I really love how this foundation looks. If you prefer lighter coverage and have dry skin, this is truly a perfect foundation for you; it's very dewy, very light, and looks really pretty on. There are certain times in my cycle where my skin gets quite dehydrated, so I end up reaching for foundations like this one. 

And despite how dark the tone looks on the packaging, the lightest shade is a perfect match for me. (For reference, I wear 44 light neutral in the Kat Von D Lock It foundation.) I personally don't use the provided sponge; my Beauty Blender applies is much faster! 

The Best Drugstore Eyeshadow

1. Wet'n'Wild eyeshadows

Whether it's the Wet'n'Wild Eyeshadow Quads or the 10 Pan Palettes, I'm not pulling your leg when I say that my Wet'n'Wild eyeshadows are my favorites. I especially like the eyeshadow quads because they are only $1.99. Seriously, $1.99. And the 10 Pan Palettes are only $4.99 each. $4.99! If you are looking for new shades of eyeshadow, they are the most affordable route and all of their foundations are really high quality, despite the price. I recently decided that I was done with warm-toned eyeshadows, so I "splurged" on several eyeshadow quads to test out some cool-toned colors. Absolutely worth it because it was less than $10 total! 

My Beauty Favorites: Highlights

My Beauty Favorites: Highlights | Writing Between Pauses

When highlighting first emerged as a trend, I was rightfully reticent. After all, as an oily skinned person, I spent my entire teenage and adult life trying to look less shiny. So as matte-matte-matte skin disappeared and full-face glam became the norm, highlighting was a natural step forward. As makeup gurus contour their faces to perfection, highlighting is just a natural part of that. 

But still, it was a hard trend to hope on. I don't typically contour--and I definitely don't use cream contours. If I'm going out for the evening, I might use bronzer alongside blush, but that's about it. However, once I started using highlighter, I realized that I really, really like it... and that you don't necessarily have to do a full contour for it to look good. 

Highlighting brings attention, and dimension, to the high points of your face. Think your cheekbones, the tip of your nose, and your cupid's bow. By applying highlight to these places, you can make them more pronounced--and create cheekbones where you might not have great ones. I have a pretty round face with prominent, and full, cheeks, so highlighting my cheekbones is a daily must now. 

I narrowed down my highlighters to my four favorites. As a note, I definitely prefer a more subtle highlight--I don't like going crazy or playing with a lot of colors--but these are not the only highlights I use! 

1. Dirty Little Secret Baked Highlighter in Bellini

I received this highlight in last month's ipsy bag (review here) and, as I posted on Instagram recently, it's rapidly become my favorite highlight. It is a more cool-toned pale pink color and applies beautifully with a fan brush. It's pigmented enough that you could also use it as a blush or even an eyeshadow. For a daily, subtle glow, this one is perfect. (I'm also partial to the Bellisima color from DLS!) 

2. Ulta Beauty Duo Chrome Illuminator

I originally received this highlight from the 12 Days of Beauty Advent Calendar from Ulta. (You can read my full review here!) As I wrote then, I was unsure of what color this highlight actually was, as it's not labeled on the packaging. However, I think it is closest to either Mermaid or Fairy (although it looks like Fairy is no longer available). It is a duo chrome, which means it is not sparkly like some highlights, but shifts between white, pink, and lavender, with a hint of blue. It is absolutely not an everyday look, but for events, it can make a huge difference. 

3. Ulta Beauty Rainbow Highlighter

Rainbow highlights aren't everyone's cup of tea, but they sure are popular. There are rainbow highlighters available from not just Ulta Beauty, but tons of indie brands as well was Wet'n'Wild, TooFaced, Maybelline, Essence, and more. Again, this is not necessarily an everyday look, but can look great in photos or for more fun events. As well, you can use the separate rows on their own, or as eyeshadows. I personally love using the yellow and gold lines as solo highlights, as well as to highlight my inner corner. 

4. Ulta Beauty Liquid Illuminator in Northern Lights

Have you tried adding a few drops of liquid highlighter to your foundation? At first, I thought this did nothing... but let me say, once I started doing it, I was surprised at how it turned out! If you are looking for a lovely, subtle glowy look, add a few drops of this liquid illuminator (Northern Lights is a very light, pearly pink shade) to your foundation and it will change your entire look. 

My Beauty Favorites: Blushes

My Beauty Favorites: Blushes | Writing Between Pauses

It feels like I didn't really start caring about blush until a few years ago. When I was in high school, I don't think anyone I know used blush. In the early 2000s, bronzer was a big deal; I remember my friends covering essentially their whole faces in bronzer. I never rocked that look (I'm way too pale), so I mostly just wore foundation, powder, and that was it. I took all the color out of my face with foundation... and didn't add any back in!  

yikes reaction

The first blush I can remember buying, at least in the last 5 years, was Wet'n'Wild's Pearlescent Pearl (a very dead-on dupe for NARS Orgasm, if you're looking!) and while I love that blush, it's not one of my current favorites.

You see... blush is now one of my favorite items to buy, one of my favorite beauty items to put on, and something that I'm a little obsessed with. Most days, I wear foundation or concealer, powder, and blush, maybe some mascara if I'm feeling fancy. So most days, blush is the thing that really makes a huge difference in my look. 

So after a very taxing decision process, I picked out my top 3 favorite blushes. (And I'll also include my 2 favorite brushes for applying blush!) 

Blush Image 2

1. Pixi by Petra in Peach Honey

I received this blush in my first Ipsy bag and when I first reviewed it, I thought it was more of a highlighter than a blush. However, after applying it one day and getting to work, I realized the truth: my bathroom lighting just sucks! It's definitely a more subtle blush and being peachier than what I usually wear, it definitely falls into the category of being outside of my go-to. However, it has such a nice, natural effect that I think it's one of those blushes that looks good on everyone. 

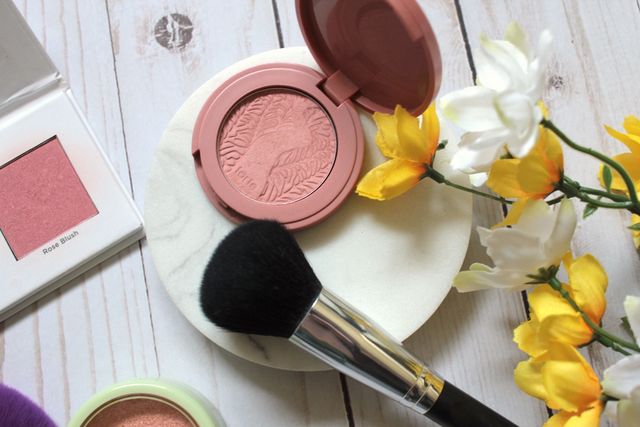
2. Tarte Amazonian Clay Blush in Paaarty

I (and almost everyone else) received this blush in the 2017 Sephora birthday gift. (If you chose the skincare gift, don't worry, you can purchase it solo.) I love this blush, even though the name is actually one of the worst ever; I never remember the correct number of "a"s. It is a perfect pink color: very traditional, very cute, and very perfect on nearly every skintone. 

3. Ulta Beauty Blush in Rose

I debated including this blush, even though it is my current "I wear this every single day" color because, well, I couldn't find it on Ulta's website! The problem sometimes with free gifts is that they don't always have everything for sale. However, this is the same shade as the Ulta Beauty Blush in Sweet Pea here; so if you want to buy it, that's a great option. This shade is a dusty, slightly mauve-y pink. I wear mauve lips almost every single day, so if I'm going for a monochromatic look, this is what I reach for. It's super pigmented, super blendable, and absolutely lovely. 

Bonus: My Favorite Brushes

I used to use my fingers to apply blush, then I would sweep it out with my powder brush (yikes). Now, I have two dedicated blush brushes (three actually, but that's neither here nor there) that I love using, depending on the formula and look I'm going for. 

1. Crown C141 Small Chisel Brush: this brush is great for blushes that are a little less pigmented and you need to concentrate to a specific area. (I also love this brush for packing on mattifying powder!) I use it specifically with my Pixi by Petra blush. 

2. F.A.R.A.H. 30F: this brush is angled, so it gives you a great sweeping look. If you're using a highly pigmented blush, this is the one you want to go for; being softer and fluffier, it blends out blush much easier. 

3 Things You Need to Know about Sulfate-Free Shampoo

3 Things You Need to Know about Sulfate-Free Shampoo | Writing Between Pauses

I'll be totally honest: I've always been really disinterested in hair products. As someone who can buy 45 different versions of the same lipstick color (and argue with my husband to the death that they are actually very different colors, thank you very much), hair products are just beauty products that I feel I don't have space in my brain for. 

I've been pretty lucky to be blessed with hair that just kind of works. I have straight, really manageable hair. I could honestly wash it with dish soap and it would behave the exact same way. (And yes, I may have done this once or twice in college.) I don't heat treat my hair and I only dye my hair its natural shade to cover grays, so I don't experience a ton of damage to it. 

My hair, by nature, is very fine (though I have a lot of it, so my hair is also quite thick in terms of amount) and I've always been able to get away with washing it every 2-3 days before it looks bad. Unlike my face, I seemed to have a natural amount of oil on my scalp and it never bothered me. But about 4 months ago, I started really struggling with a dry scalp. 

I tried every tea tree oil shampoo I could find, convinced I wanted to go natural. When those did nothing, I switched to Head & Shoulders, angry that I had to go with an option that wasn't cruelty-free. And while Head & Shoulders made it marginally better, I still would get a dry, flaky, itchy scalp within a day of washing. I went to the dermatologist and was told I didn't have dandruff or seborrheic dermatitis; my scalp was just dry, so when my hair got even a little oily, the skin would lift. The dermatologist told me to just wash my hair every day. 

Which I did and it didn't really help. And my hair started getting quite limp from all the washing. 

While listening to a podcast recently, a guest mentioned that people with dry, flaky scalps should try going sulfate-free. I had tried a few sulfate-free shampoos and I wasn't totally impressed with them--but I was willing to give it a shot. Anything that allowed me to go more than 24 hours between washes without a flaky, itchy scalp! 

I started doing a lot of research on sulfate-free shampoos and came to conclusion that trying it would be absolutely worth it. I knew it might require me to stick with it for a while--not something I'm great at--but I really wanted to give it a try. 

All my research gave me the idea that I needed to share what I've learned about sulfate-free shampoos. 

1. Sulfates are what make shampoo sudsy--and they do not cause cancer. 

For the last few years, I've been seeing this scary meme floating around Facebook (especially in my mom groups) that sulfates in shampoo cause cancer. That's categorically false.

Sulfates are simply an ingredient in shampoo that makes it sudsy; they also are a type of surfacant, which means they attract oil and water to themselves. This allows oil and debris to be removed from your scalp--but it can also strip natural oils from your hair too, making it dry and brittle. If you struggle with a dry scalp or dry hair, you may be particularly sensitive to sulfates--and so switching to sulfate-free shampoo would be a good things to try. 

2. Sulfate-free shampoo makes hair color last longer. 

If you dye your hair, and notice that your color is fading quite quickly, switching to sulfate-free shampoo can make a major difference. I primarily used eSalon's shampoo for a long time--but as I started struggling with my dry scalp, I had to switch to harsher shampoos that I felt stripped my color. Since I've switched to the Kristen Ess sulfate-free shampoo, I've definitely noticed that my color is not fading nearly as fast. 

3. Going sulfate-free is most beneficial for certain hair types. 

There are some who will benefit from going sulfate-free and some who won't. If you have relatively easy hair, and a scalp that never gets itchy or too oily, then sulfates are the easiest way to clean your hair. Going sulfate-free means you spend a little bit more time manually cleaning your scalp. 

Those with dry and/or frizzy hair can benefit from sulfate-free shampoos, especially those that use coconut extracts instead of sulfates. As well, anyone who struggles with eczema or other skin conditions might benefit from going sulfate-free too, as it can help alleviate dry skin and itchiness. 


I'm two weeks into using Kristen Ess's The One Signature Shampoo; I'll update this blog post when I know exactly how it has helped my scalp. I've definitely seen a reduction in flakiness and I've been much less itchy since I started using it, but I want to give myself a little bit more time! 

Do you use sulfate-free shampoo? What's your favorite kind? Have you seen it help your scalp or hair? 

Beauty Review: My 3 Favorite Pacifica Items

Beauty Review: My 3 Favorite Pacifica Items | Writing Between Pauses

I often get messages from my friends asking me the best drugstore products. Not everyone has the money to go to Sephora or even Ulta and splurge on the best skincare out there. For most people, that's not just out of their budget, but it's more time than they have to spend. Most of the people I know are working long hours, volunteering, taking care of kids or houses or both... they don't really have time to research skincare products, order from indie websites, or drive somewhere other than their usual grocery store. 

My recommendations are usually based on what I myself use... and one of my favorite brands out there right now is Pacifica. I've been seeing them at Target for a long time, but it wasn't until about 6 months ago that I started  buying from Pacifica. 

Here's why I love them: they are cruelty-free; they are affordable; and they have tons of options. Oh and their packaging is super cute. I thought I'd share my top 3 favorite items from Pacifica. All of these products are available at your local Target or Whole Foods. 

1. Kale Luxe Oil-Free Multi Cream

I recently ran out of this moisturizer and it was a really rough day! A tube lasted me about 3 months, which is pretty cost effective. (I'm using a sample tube of this Pacifica moisturizer right now; I'll write more once I know how my skin reacts to it!) I love this moisturizer because it's perfectly light and doesn't leave me feeling grimy afterwards (which is usually my issue with moisturizers). It also smells like kale, which makes me feel like it really does have a lot of kale in it! The smell is a little difficult to get over at first, but after a while I started to associate it with my evening routine. 

2. Sea Foam Complete Face Wash

I am a dedicated fan of the Body Shop's Tea Tree face wash; however, recently on vacation I forgot my travel size bottle of it and I bought this face wash at Target in a pinch. And honestly, I might have to make the switch or start using it half-time. Because I really love it! It smells like coconut and sea salt, it foams up so nice, and it leaves my skin feeling super soft. If you're acne prone and looking for a face wash that leaves you feeling refreshed and not at all dry, this is the perfect one. 

3. Rose + Tea Aromapower Mineral Bath Salts

As a bubble bath fiend, I've been trying to reduce my use of bath bombs; as much as I like them, they stain my tub! A friend got me these bath salts to try and honestly, I may never go back. The scent is super light, yet very girly and refreshing, without staining my tub or leaving me feeling like I was coated in glitter. These are the perfect relaxing treat at the end of the day! 

4 Essential Items for Spring Travel

4 Essential Items for Spring Travel | Writing Between Pauses

It's Spring Break! At least for my husband, Danny. We always look forward to spring break because we spend it either visiting his parents or relaxing. This year, his parents are coming to us. 

I try not to turn trips into excuses to buy a whole bunch of new stuff. But there is something very exciting about treating yourself to a few little things for your trip, whether it's just a new makeup bag or an outfit. I put together a list of 4 great essential items to treat yourself to this year. Whether you're leaving tomorrow or in a few weeks, these will be perfect to take along. 

Spring Essentials Graphic

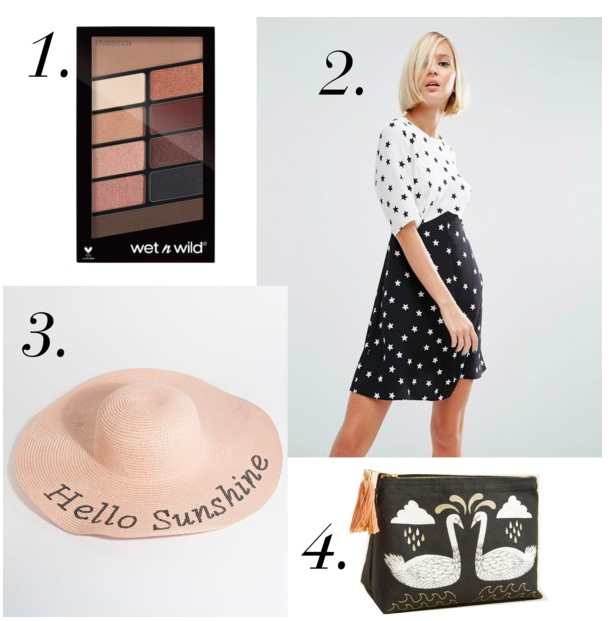
1. Wet'n'Wild 10-Pan Palette in "Nude Awakening", $4.99

I know what you're thinking: a $5 Wet'n'Wild eyeshadow palette? Listen, I thought the same thing when I first bought one of these palettes (they have them in 4 different color stories). But these shadows are really, really good. The Rose in the Air one is a dupe for Modern Renaissance. This palette is perfect for every kind of look: simple day looks, single shadow looks, and smoky, dramatic night looks. And for only $5, it's a total steal. 

2. ASOS Mix'n'Match Star Print Dress, $23

This dress is so cute: long enough without being fussy. And no weird cut outs. (Trust me, I checked.) I love the mix of star prints, as well as the shape; with the nipped in waist, it flatters every body type, but isn't so cinched that you'll be uncomfortable. 

3. Unique Vintage Hello Sunshine Sun Hat, $32

A sun hat, especially if you're traveling somewhere very warm, is an absolute must. Protecting your skin will keep you looking flawless. (So don't forget SPF either and if you tan, you're still damaging your skin!) I love this one from Unique Vintage; it's almost like it was made for cute Instagram photos. While it's a little spendy for $32, it's very sturdy and will hold up to just about everything. 

4. ModCloth Swan for the Books Make Up Bag, $14.99

Going on a trip means you need a new makeup bag, right? This one from ModCloth is so cute--and sturdy. I love the swan print; it's cute without being "too much." It's the perfect size for carrying everything you need for a short trip. Plus, it's on sale right now!