March 2018 Wrap Up

March 2018 Wrap Up | Writing Between Pauses

March has been an absolute whirlwind of a month. I'm still a little surprised to find myself at the very end of March, looking into April. Didn't March just start? 

It's often odd to me that the months I feel go by really fast are often months that weren't exactly bad, but weren't good either. March was a bit of a rough month for us, thanks to a general lack of sleep and a major change to our routine. 

Things I Learned

I learned to not take advantage of good luck.

Forrest switched to a "big boy bed" at the very tail end of February. For the first week, he did really great... I thought things would be fine. However, he started really struggling to both go to sleep and stay asleep, two issues that we've never had with him. He's also started waking up at 3 or 4am and playing for hours, without making noise, until we wake up at 5 or 5:30 and see that he's out of bed! (Thankfully, he can't get out of his room.) 

This isn't something I would typically write a post about, but wow, it's been rough. You think that once you get through the newborn sleep problems and eventually talk yourself into sleep training that things will be fine. Forrest has been sleeping 12 hours a night straight, without fail, since he was 9 months old. Since then, we've never struggled with his sleep, so we've been a bit spoiled. I've been massively sleep-deprived the last few weeks, more than I have been in a while, and as a result, my tension headaches and migraines have been absolute killers. 

I'm hoping we're through the worst of it and have a good routine figured out. Otherwise, I'm going to just need a constant drip of coffee going. 

Things I Loved

Daffodils. IT'S HERE! Spring has arrived! Sort of. I took this photo halfway through the month. Last Friday, it snowed the entire day and through the night. On the first day of Danny's spring break! The daffodils that had bloomed are unfortunately now frozen, but at least I got a photo. 

Danny's birthday. Danny turned 29 on March 14; I've been 29 since October, so it was nice of him to catch up! He had a fun birthday (well, as fun as it can be when you're an adult working) and I treated him to a few new clothes, a new movie, and a cake. 

Sulfate-free shampoo. I've been really struggling with an itchy scalp for a few months. I've tried a few things that work for a little while and then stop. Finally, I bit the bullet and invested (literally, this was $10 shampoo!) in some sulfate-free shampoo. Alongside using pure tea tree oil (diluted, of course), I've already noticed an improvement in my scalp. I'll write more on this later! 

My Favorite Content

Thanks for reading! Tell me: how was your March?

Here Are 5 Steps You Need To Know To Write Killer Blog Posts

Here Are 5 Steps You Need To Know To Write Killer Blog Posts | Writing Between Pauses

Back when I started blogging, I really didn't pay attention to, well, anything when it came to my content. I wrote what I wanted. I used photos that didn't really go and weren't consistent sizes. When I was really into fashion blogging, the popular thing was to use song lyrics or quotes as the titles of your blog posts. It was so much fun trying to decide what to title my posts! 

These days, with the blogging world being what it is, it takes a bit more effort than that. Even if you're just blogging for a hobby, you want to do the best you can with what you have--ultimately, if you're blogging, you want readers! And the best way to attract readers is to write great content and then ensure that you hit every point to ensure that readers can find that content.

But how can you do that? If you're like me, you work a full-time job, or you're a mom; you don't have time to learn every SEO tactic or spend hours writing posts. Well, I have 5 steps for you to follow to ensure that you can write killer blog posts with the time you have. No messing around, no fussing, no spending hours deciding what to write. 

1. Take or find the perfect photo. 

Humans are naturally visual people. We like art. We like photos. So your blog post should start with not just a topic, but taking or finding a perfect photo. If I don't feel like taking photos, I use Unsplash to find a stock photo that fits my topic. Then, I use Canva to create blog graphics that are uniform and use the same fonts every time. (This is the simplest part of branding: ensuring that all your images and blog graphics have the same basic look that people can recognize and associate with you. It also makes your blog look cleaner!) 

2. Craft the perfect headline. 

Writing headlines (or titles) for my blog posts is one of my least favorite tasks. Most people struggle with it. In my career in content/digital marketing, almost everyone I know struggles to write headlines. It's a universal issue! There are so many rules about what headlines work and what headlines don't, especially for blog posts. Thankfully, I have some resources. 

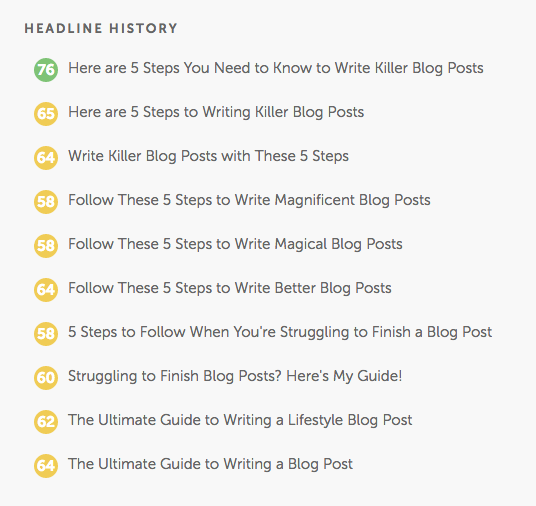
Firstly, CoSchedule's Headline Analyzer is a free tool that anyone can use (they do ask you to sign up for their newsletter, but their newsletter is very informative!) It scores your headlines using a simple algorithm for successful headlines. Here are a few I wrote for this post. 

CoSchedule Example 1

I usually like my headlines to score between 65 and 75. However, sometimes, if I am particularly tied to a title, I just ignore the score! However, using this analyzer is a great way to learn how to write headlines--so you can just go for it sometimes instead of hemming and hawing! 

CoSchedule Example 2

Here's what the breakdown looks like. CoSchedule has a great breakdown on blog post types and examples of common, uncommon, emotional, and power words here

I usually write about 15-30 headlines for each blog post until I decide on the one. 

3. Outline your thoughts. 

Diving right into writing can seem like a good idea, but writing down an outline, even if it is just a rough sketch, will ensure that you stay on topic and don't get stuck halfway through writing. Even if you're not writing a blog post that features a list or steps, you can jot down all the points you want to cover. For this blog post, I wrote down the 5 steps I wanted to include, then started backwards from there to pick points for my introduction.  

4. Clean up your copy. 

I am a verbose person, so this is hard one for me: once you're done writing, go through your blog post and clean it up. Remove repetitive phrases. Shorten sentences. Move separate thoughts into separate paragraphs. This improves the readability of your post. (Most blog posts are skimmed anyway, so the faster you can convey your information, the better!) 

5. Check for places to link other blog posts. 

If you can link to other blog posts of yours (or your friends!), do it! It's worth taking a few extra minutes to add links and include a brief sentence as to why they should click over to that blog post. 

BONUS: 6. Share to Pinterest, Twitter, and Facebook. 

Alright, this isn't a step about writing, but it is about getting those all important readers. None of us like talking to thin air, that's for sure! I share my blog posts automatically via Squarespace with my chosen hashtags. I then make sure to pin daily to Pinterest, as well as to my group boards on Pinterest. If you use Facebook, share your post there too; Facebook is the number one website for referral traffic. 

4 Essential Items for Spring Travel

4 Essential Items for Spring Travel | Writing Between Pauses

It's Spring Break! At least for my husband, Danny. We always look forward to spring break because we spend it either visiting his parents or relaxing. This year, his parents are coming to us. 

I try not to turn trips into excuses to buy a whole bunch of new stuff. But there is something very exciting about treating yourself to a few little things for your trip, whether it's just a new makeup bag or an outfit. I put together a list of 4 great essential items to treat yourself to this year. Whether you're leaving tomorrow or in a few weeks, these will be perfect to take along. 

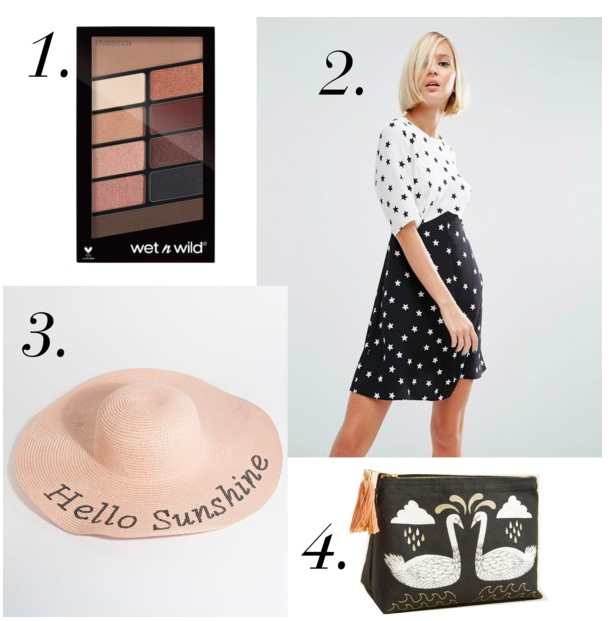
Spring Essentials Graphic

1. Wet'n'Wild 10-Pan Palette in "Nude Awakening", $4.99

I know what you're thinking: a $5 Wet'n'Wild eyeshadow palette? Listen, I thought the same thing when I first bought one of these palettes (they have them in 4 different color stories). But these shadows are really, really good. The Rose in the Air one is a dupe for Modern Renaissance. This palette is perfect for every kind of look: simple day looks, single shadow looks, and smoky, dramatic night looks. And for only $5, it's a total steal. 

2. ASOS Mix'n'Match Star Print Dress, $23

This dress is so cute: long enough without being fussy. And no weird cut outs. (Trust me, I checked.) I love the mix of star prints, as well as the shape; with the nipped in waist, it flatters every body type, but isn't so cinched that you'll be uncomfortable. 

3. Unique Vintage Hello Sunshine Sun Hat, $32

A sun hat, especially if you're traveling somewhere very warm, is an absolute must. Protecting your skin will keep you looking flawless. (So don't forget SPF either and if you tan, you're still damaging your skin!) I love this one from Unique Vintage; it's almost like it was made for cute Instagram photos. While it's a little spendy for $32, it's very sturdy and will hold up to just about everything. 

4. ModCloth Swan for the Books Make Up Bag, $14.99

Going on a trip means you need a new makeup bag, right? This one from ModCloth is so cute--and sturdy. I love the swan print; it's cute without being "too much." It's the perfect size for carrying everything you need for a short trip. Plus, it's on sale right now! 

Beauty Review: My March Ipsy Bag

Beauty Review: My March Ipsy Bag | Writing Between Pauses

Last month's Ipsy bag was such a winner, I knew it was going to be hard to follow up. And true to form, I found myself a little disappointed (as Danny said, dis-ipsy-pointed) this month. It's not a bad bag, though! (To read my past Ipsy reviews, click here.) 

1. Doucce Freematic eyeshadow mono in Lola, $10

If you watch my Instagram story, you saw my surprise when I popped these eyeshadow out of the little pouch and... it's just a pan. These is nothing to hold it in! I personally do not like buying eyeshadow singles for this exact reason, so I'm of the opinion that if I get sent a sample of an eyeshadow... it should come in some kind of component that makes it easier for me to store! Thankfully, I've been considering de-panning my Power of Beauty palette (the TooFaced/Nikkietutorials one), so I'm buying a magnetic palette anyway. 

This eyeshadow is really smooth and the design is very cute. The color I received is a mauvey pink, kind of cool toned. I'm not really a pink eyeshadow person; it makes me look a little like I have pink eye. But this is a really pretty, shimmery shade. 

2. Royal + Langnickel Prismatic Ombre Fan Brush, estimated $6 value

I've been wanting to get a fan brush for so long, but I haven't been willing to spend money on one (the story of my life), so I was really excited to see this in my bag this month. It helps that it's a super pretty brush anyway; prismatic, metallic, and rainbow colored! I'm really happy with how it applies highlight too; I'm a little "over" highlight and I think a fan brush applies a much lighter layer than a brush that "packs it on," so to speak. 

Note on estimated value: I could only find this brush in a set that came with a small bag and 2 other brushes. It cost $20, so I estimated that a single fan brush is valued at approximately $6. 

March Ipsy 2

3. Dirty Little Secret Cosmetics Baked Highlighter in Bellini, $14

This is the second baked highlighter I've received in 2 months--and funny enough, it's in the exact same component as the highlighter I received last month. Exact same component, exact same shape of highlighter, really close in color. This one is a more peachy pink tone than lavender and while it's quite pretty, I'm kind of at my limit for highlighters (I have so many at this point). However, it's really gorgeous and not like any other highlighter I own, so I can't really complain! 

4. Tarte Cosmetics Sex Kitten Eyeliner, estimated $10 value

So, I received a pencil eyeliner in my January bag and I expressed my dismay then that I find pencil liners very dated. (No offense if you love pencil eyeliner, but my gosh, 2004 called, they want their tightlining back.) I even told this to Ipsy. And yet they sent me another one. Which I won't use. I put this right in my "donate" bin, unfortunately. 

Note on estimated value: this sample eyeliner is half the size of the full size (and only has one tip). Therefore, I estimated it is worth about half the original price. 

5. Goldfaden MD Facial Detox Mask, estimated $26 value

This mask... truly, it's the best part of this bag! I love it. It felt so good when I put it on and smelled like eucalyptus and tea tree oil, which is one of my favorite smells. I was in heaven! When I rinsed it, my skin felt so soft and smooth--even the next morning, after a night of jojoba oil, my skin felt much smoother than usual. It was a nice treat. However, a full size of this mask costs $65! That's a lot of money to spend on one single thing, but you know, it might be worth it. 

Note on estimated value: the full size Facial Detox Mask costs $65 for 50 ml; the sample I received is 20 ml, so the full size is 2.5 times it's size. I used the $65 to estimated that this sample tube would be worth about $26. 

March Ipsy

Final thoughts

The total value of this bag is $66, which isn't bad. The bag itself came with markers to color, which is very fun. However, I know from experience that even permanent markers run on fabric unless you soak it in vinegar after coloring--and no way am I dunking this bag in vinegar! I colored a few bits of the bag, but not much... I don't want to risk it getting wet and ending up with pink and lime green everywhere!

This bag was a bit of a disappointment; there was one miss (the eyeliner) and just a little bit of fatigue regarding the eyeshadow and highlighter. But one of the things i love about ipsy is that it helps me build up my collection of brushes, and try products that I would never before. It's not enough of a dud to make me cancel. If you'd like to try ipsy, click here to use my affiliate code; I do receive a small points kickback for you signing up! 

Want to Write More? My 5 Tips to Get More Time

Want to Write More? My 5 Tips to Get More Time | Writing Between Pauses

There are lots of reasons we get too busy to write. Housework. Real jobs. Kids. Stress. The book that's calling your name that you need to finish. Social plans. If you love to write, writing is easy to push to the side.

Why? Because it's hard. Writing is hard! Let's just admit it!

Society tends to think of writing (in the broadest sense) to be absolutely easy. We all write every single day. Text messages, emails, tweets, Facebook updates, Instagram captions. We all write, so how hard is it, really, for someone to string enough sentences together for a book or a poem or a blog post? 

The truth is, writing is hard. Mentally, it's an exercise in patience to try to squeeze what you see in your brain out onto the page. And physically, it can be challenging; you're in one place for a very long time, with 100 distractions, having to concentrate very hard and type. 

Honestly, why do any of us do this? 

So, you've come to the conclusion: you want, no, you need, to write more. It's paramount. But you've got a toddler, or you've got a full time job, or you've got a million other things on your plate and that great idea you had for a short story or a poem has been languishing for so long that the spark of inspiration isn't just a dying ember, but a little piece of charcoal. 

Here are my five tips to sneak in writing. 

1. Say it out loud

Oh yeah, you heard me. Writing: it's about sitting with a notebook or a computer and getting it out on the page. Or is it? What's to stop you from recording voice memos on your phone of lines you think of while you're in the grocery store, or waiting in the pick up line at school? Record it, save it, and return to it later when you have more than 30 seconds. 

2. Carry the notebook

This is, truly, every writer's least favorite tip, but it's true: carry the notebook with you. Honestly, just carry it. It feels pretentious, to have that little notebook in your purse or in your back pocket, but when you're waiting for coffee and get an idea--you'll think me. You'll have somewhere to put it. 

(If you don't love tiny notebooks, you can also use the Notes app on your iPhone or equivalent smartphone.) 

3. Get up earlier

The birds are singing, the sun is starting to rise earlier than before. You have more daylight hours. So why sleep through them? Waking up at 5 or 5:30 isn't everyone's cup of tea, but if you don't leave for work until 8:30, then why not spend an hour in the morning writing? Isn't that an extra hour in your day to achieve something you really, really want? 

4. Maximize the time you do have

You set aside an hour or two in the evening to write. But some nights, you spend it watching TV, browsing Twitter, or doing something else. You know you need to write, but the couch is so comfy. 

Listen, routine is everything when it comes to developing habits. If you actually want to spend the time your kids are in bed, or you don't have work responsibilities rearing their heads, then you actually have to make the habit. So, even though the couch is comfy, fix your favorite drink and head to the computer. (Just make sure your drink is on a coaster far away from your keyboard!) 

5. Ask for Time

You have a roommate who watches TV while you do the dishes, or a husband that starts working again right when he gets home. You want time to write, but you find yourself picking up the slack of others. Let me tell you: that's not going to work. Ask for the time. It's easy. "Honey, I would like an hour to go get some writing done. Can you watch the kids?" or "Hey, can you finish these dishes so I can go finish up something I'm working on?" takes 5 seconds. If asking doesn't work, demand it. "I need an hour!" you will say, going into your office and closing the door. 

If the toddler destroys the living room, you'll deal with it later. 

More Posts on Writing

6 Months Later: An Update on Quitting Dairy

6 Months Later: An Update on Quitting Dairy | Writing Between Pauses

It's been 6 months since I wrote my post about quitting dairy. It feels like a long time ago, but yep, only 6 months. 

Even though I wanted to be completely dairy free by now, I'm still not. My biggest struggle has been replacing butter; I don't like butter substitutes because while butter isn't the healthiest substance in the world, it's void of hydrogenated oils, which are actually worse for you than trans fat. As well, coconut oil, the preferred vegan cooking replacement, is hydrogenated and actually 82% saturated fat; one tablespoon is 11 grams of saturated fat, and the limit suggested by the American Heart Association is 12g of saturated fat per day. (To read more about how fitness blogs and fake health experts have mislead most of the public about coconut oil, click here.)

The other preferred substitute are basically margarine, most of which contain soy. One brand makes a soy-free version that I would describe as being like eating solid oil. It's not good. 

I've started using olive oil again in cooking (ugh, the most expensive mistress!) and most of the week I use avocado or peanut butter on my toast. But every Sunday, I treat myself to buttered toast (my favorite food in the entire world). 

I haven't had milk in my coffee, not even from Starbucks or Dutch Bros, since around October. That's been a big one for me; I love a creamy Starbucks frappucino and i really worried that the almond milk version wouldn't be as good. But gosh, I was wrong. (Also, Starbucks had a toasted toffee almond milk hot chocolate at Christmas that was truly heavenly.) 

The big question I get is, has quitting dairy helped my skin at all? As I wrote in my blog post on my acne journey, I saw a lot of good results with jojoba oil. (I have noticed a lot of texture on my face recently from my super simplified skin routine, so I've added an extra exfoliation during the week; just something to remember if you want to try jojoba oil!) I still get a little bit of acne related to my cycle, but nothing like I used to experience. 

I've also noticed that if I eat something with dairy (like cheese or a lot of sour cream), I tend to break out almost immediately. Like, within hours. Obviously, this is only anecdotal, but it has definitely scared me from "treating myself." (A few times, I've run out of almond milk and had to use Forrest's 2% milk in my coffee; I regretted it every time!) 

It gets easier to go without dairy as time goes on. I don't miss cheese and milk as much as I thought I would; finding replacements for things (like sour cream) has been pretty exciting. I do occasionally still have a yogurt, as I find it doesn't aggravate my skin as bad as other dairy products.

I'm really happy with my decision to quit dairy. I'm going to give it a full year before I decide if it's something I want to do for the rest of my life, or just try to limit for the time being. 

10 Habits I've Started to Reduce Anxiety

10 Habits I've Started to Reduce Anxiety | Writing Between Pauses

I've struggled with anxiety since I was quite young. 

When I was 2, I was well known for twirling my hair. This habit didn't go away when my pediatrician said it would; in fact, it got worse. If you know me today, you know that I still twirled my hair near constantly. Not as obviously as I did when I was 2, but still noticeably. I like braiding my hair or rubbing it between my fingers, or twisting it around my finger over and over again. 

I never associated my hair twirling with anxiety, but I've learned, as I've gotten older, that I use it as a way to comfort myself when I feel anxious. 

The last few years of my life have been defined by anxiety--to the point where my anxiety started to have effects on my health. 

Lots of people have lots of different ways of dealing with their anxiety--and what works for some people definitely doesn't work for other people. For me, my anxiety often calms down when I'm able to spend a whole day cleaning my house and getting bits of my life in order (something I've been desperately wanting to do for ages now). For others, they feel better when they get a chance to relax or treat themselves in a way they normally do. It just depends!

When I sat down to write this post, I thought of every different way I could indicate that these are just the things that work for me and I'm sharing them only in the hope that perhaps they can help you deal with your anxiety. I'm not a doctor and I'm not being prescriptive with this list. If you're really struggling with your anxiety, the best place to turn is a doctor--not the internet, unfortunately. (It's also important to remember that acts of self-care aren't just bubblebaths and eating your favorite foods, but also include self forgiveness, acts of self-kindness, and much more--and ultimately, self-care can't replace other forms of treatment for anxiety and depression! Get the help you need!) 

So, if you want to learn a few ways I've been helping my anxiety lately, keep reading!

1. Bullet Journaling

I've written about bullet journaling before and I know that for those with anxiety, bullet journals (especially as they appear on the internet) can feel really demanding and, honestly, a little anxiety-inducing. But once I gave bujo a chance (and let myself do it my way, instead of feeling like I had to have The Perfect Journal) it was really fun! I spend every evening working on my bullet journal, writing about my day, and filling out any pages that need filled. 

2. Exercising

I know this feels a little bit lame, but it's been a year since I started working out again and honestly, it's one of the best choices I ever made. For me, exercise walks a fine line between "reduces anxiety" and "causes anxiety". I have to be really mindful of how exercise is making me feel and if it starts to feel bad, I take a break. But overwhelmingly, getting myself in a routine feels really good; I love having my exercise time three days a week where I get out of the house. 

3. Creating a cleaning routine

The way my surroundings look is really important for me. I have to be in a clean, organized house. This has been a sore spot for me for a while because my husband is the exact opposite. I genuinely think he could live inside an active, operating barn and be totally fine, probably not notice a thing wrong. I've started doing what I call my "5 tasks" in the evening before bed and it makes a huge difference: emptying the dish strainer, loading the dishwasher, wiping the counters, cleaning the coffee pot, and sweeping the kitchen floor have made a huge difference in my anxiety level each morning. 

4. Reading

I've always been a reader and I read quite a lot, but for the past probably 6 months, I just haven't made time for it. But taking 10-20 minutes every day to read, instead of look at a screen, has really helped me not get my usual afternoon tension headaches. 

5. Washing my face

As much as I love skincare, sometimes I'm the worst at washing my face. But I have found that washing my face and doing the skincare routine that I really, really love helps relax me in the evenings and lets me unwind much easier. Who knew!? 

6. Listening to podcasts in the bathtub

I love podcasts (I've written at least three blog posts about it!) and I love taking baths. I used to primarily read in the bathtub, but I found that actually didn't help me relax as much as I wanted it to. I've started turning on my podcasts as I soak though and it's exactly what I need: something to occupy my brain, but not too much. 

7. Going to bed early

I have this weird thing about "using the time I have before bed", whatever that means. After Forrest goes to sleep, I feel like I have to accomplish everything: clean the house, food prep, whatever. So I usually don't get into bed until 10pm, then I'm up at 5--and frankly, that's just not enough sleep sometimes! And some nights, I just don't feel like tackling my rapidly expanding to do list and... you know what? Sometimes I don't have to. The email can wait until the morning. The blog post can get written some other time. Crawling into bed at 7pm simply because I feel like it is the best treat I can give myself. 

8. Eating breakfast

I've always really struggled with breakfast, as I'm usually not hungry right when I wake up and then I don't have time once I leave for work. But skipping breakfast also gives me a lot of anxiety: I worry about getting hungry later in the day, not having anything to eat, having to find something and spend money... you know, anxiety thoughts. I've been packing simple breakfasts for myself lately--cheese and crackers, yogurt and granola, smoothies, that kind of thing--and it's made a huge difference in allowing me to focus on my work and not feel anxious about getting hungry. 

9. Reducing how much coffee I drink

I love coffee. When Forrest was a newborn, I drank probably 3-4 cups a day, which is substantial for me, someone who never liked coffee before. I've gotten it down to less than 3 in recent months, but even that is quite a lot. Especially since I have pre-existing anxiety issues! I've started limiting myself to one cup in the morning and one cup in the afternoon. Hopefully soon I can cut out that afternoon cup! 

10. Quitting if I need to

I pride myself on not being a quitter. I try not to give up on tasks I set for myself, especially if they impact other people. But lately I've realized that sometimes my insistence on "finishing things" ends up biting me in the butt, for two reasons: firstly, I tend to not do that great of a job if I end up forcing it; and secondly, it just gives me horrible anxiety. Allowing myself to quit something, or at least set it aside for a few weeks and return to it when I feel motivated and able to complete it, has been really freeing. 

3 Affordable Accessories to Improve Your Blog Photos

3 Affordable Accessories to Improve Your Blog Photos | Writing Between Pauses

One of the most difficult parts of blogging, for me, has always been the photography. I really enjoy photography, but it's not something I'm inherently good at--and I've never really been patient enough to really settle down and learn much beyond just getting it done. 

I don't think blog photos need to all look the same. Trust me on that one: you can be successful with photos taken on your iPhone. As I've written before, I have a tried-and-true process for iPhone photos. (You can also read my post on improving flat lay photos here.) 

Another thing I've always been unwilling to do is pour a ton of money into taking blog photos. If I already bought the product I'm taking a photo of, then why on earth would I spend more money to take a photo with it? I've never bought a better lens for my camera (despite really, really wanting one) because I just don't foresee it paying off in the long run; for the same reason, I just don't believe in buying a ton of materials to make my blog photos pop. 

Here's what I have bought to help improve my blog photos. 

1. Printed poster board ($1.99 at craft stores or $20+ for a pack) 

The biggest change to my photography game has been buying a printed poster board. I got mine for $2 from Michael's; it's a rustic, white, barn wood background. It has really made my photos look a lot prettier and more cohesive! Plus, it's easier for me to organize items on a smaller space. These are just like the one I have, but for a pack of 12! However, if you check your local craft stores, there are tons of designs, depending on what you want for your photos. There is a really pretty pink floral one at my local Michael's that I'm definitely considering. 

2. Create a "stage" (<$30) 

Many times, photos are staged on a platform. Many people use their desk that they clean up for this. However, I realized I needed a bit more space and freedom (and also my desk is a constant mess of bills and notebooks). I tore down a diaper box to be the bottom, plus 2 sides; I just recently bought some cheap sheets of tile, like you put on a backsplash, and have been working on a way to fix them onto the box. Then, I'll paste a plain white foam board to the bottom and voila! I've made my own little stage that can mimic a bathroom sink, or a kitchen counter, or anything really. This is still a work in process,  but so far, it's only cost me $20 for the three sheets of stick on tile and foam board. 

3. Camera Tripod (<$20) 

My greatest issue taking photos with my DLSR (which I've started to do more, even though I love the ease of just using my iPhone) is that I have quite shaky hands. If I'm taking photos in low light, then I've adjusted the settings on my camera enough that even the slightest shakiness will end up with blurry photos. I've just put in an order for a new tripod; I picked this one, which comes with a remote. However, you can find tripods for as cheap as $10-15, depending on where you look. As long as it attaches to your camera, or has a way of holding your cell phone, it doesn't need to be expensive!